Chunky Bunnies - DIY Spring Craft
Author: Lolli
Ingredients
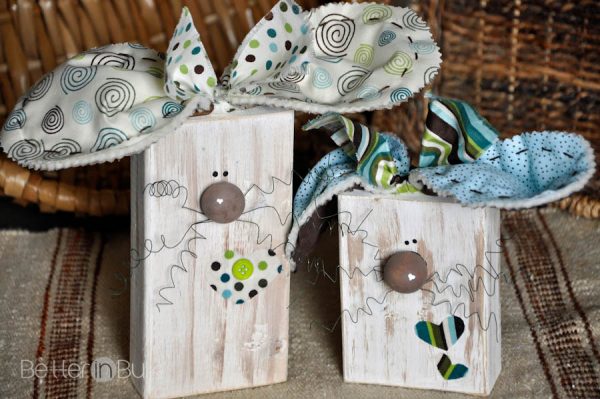
- 2x4 blocks of wood cut at different lengths
- Sand paper
- White and brown acrylic paint
- Sponge brush
- Wooden balls for nose
- Wood glue
- Fabric scraps
- Batting
- Pinking shears and/or scissors
- Embroidery floss
- Wire
- Mod podge
- Wax paper
- Pencil and Black marker (like a Sharpie)
- Needle and pins
- Wire cutters
- Hammer and nails
Instructions
- With a wet sponge brush, give your blocks of wood a light white wash. I like to paint (and dry) on a large piece of wax paper.
- While your blocks are drying, paint your wooden balls brown.
- While the brown paint is still on your brush, lightly streak your blocks of wood.
- Sand all edges with sand paper.
- Glue balls to blocks of wood, a couple of inches from the top.
- Draw dots for eyes with black marker.
- Twist 3 long strands of wire around the ball, with similar lengths extending on each side for the whiskers. Wrap the wire whiskers around a pencil to make them twisty and kinked.
- Cut small hearts out of your fabric scraps and attach them to the wood with mod podge on both sides. Let dry. You can add buttons or any other decorations to make your bunnies unique.
- Print and cut out the bunny ear pattern. Pin the pattern to the fabric you're using for the ears (two pieces of fabric plus batting for each ear).
- Layer fabric as follows: bottom (right side down), batting, top (right side up).
- Sew the ears together using all 4 strand of a length of embroidery floss. Use long, visible stitches. Secure with a knot.
- Attach a contrasting fabric as a ribbon by pinching the center of the ears and tying it on (this pice of fabric can be frayed or left as is).
- Nail the ears to the top of the bunnies with a long nail.
Recipe by Food Fun Family at https://foodfunfamily.com/chunky-bunnies-craft/