This tutorial was written by my co-host, Beth from Manic Mother.
What is aperture?
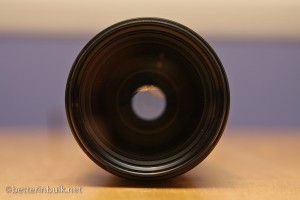
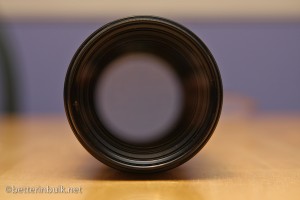
Aperture is the hole inside of your lens that lets light in. Different lenses have different apertures. A lens of f/1.4 will have a large hole where as a lens of f/4.5 will have a smaller hole.
Aperture is measured in something called “f stops”. Lets say you have a lens that has a maximum aperture of f/1.8. When you set the aperture to f/1.8, the hole in your lens will be at its largest, and will allow the most light in (this is called “shooting wide open”). Now lets say you switch the aperture to f/22 – that same hole will become much smaller and allow in less light.
So the smaller the f stop number, the larger the hole in your lens becomes, and vice versa.
Which aperture to use?
There are a few things to consider when choosing an aperture. First of all, you want to look your available lighting. If you are shooting pictures indoors where lighting is limited (and you aren’t using a flash) you will want to choose a large aperture (small number). I often shoot at f/2.8 (the largest aperture I have available on my favorite lens) when inside, or the largest aperture the lens I’m using has. Remember, the larger the aperture the more light you are letting in.
If you are outdoors or in a well lit area, you can vary your aperture for different effects. When you make adjustments to your aperture you are also going to effecting the depth of field in your picture. The best way to illustrate this is with examples. We will be explaining depth of field in greater detail in a future Bloggography tutorial.
A large aperture will give your picture a shallow depth of field. Meaning that only what you focused your lens on will be in focus and the area around it will be blurry. Like this:
Shot at f/2.8
The smaller you make your aperture, the more of your picture comes into focus. Like this:
Shot at f/7.1
Even smaller, and even more is in focus. Like this:
Shot at f/11
A little tip from Lolli:
I like to picture aperture in terms of eyes.
Open your eyes as wide as they will go. Lots of light comes in, but not much is in focus.
Squint your eyes, and less light comes in, but more of your field of vision is in focus.
Where is my aperture?
On a Canon dSLR, you’d set your mode dial to Aperture priority mode (Av). The aperture value can be adjusted with the dial (usually located right behind the shutter button). In this photo, my aperture is set to f/2.8.
If you cannot adjust your camera’s aperture, using the Portrait mode (which automatically sets a high aperture) will give you the blurred background effect that is so often sought after.
To see how the mode dial will look on a Nikon, visit Manic Mother.
Things to remember/know about aperture:
– the smaller the f stop number the larger your aperture is.
– when shooting in low light choose the largest aperture available.
– shooting with a large aperture may only put part of what you are trying to focus on, in focus. For instance, a nose will be in focus, but the eyes won’t. Check your shots, and adjust your aperture accordingly. This is especially important when taking larger group shots. It really stinks when Aunt Maggie is in focus but cousin Fred is blurry because the aperture was too large.
– Av mode is a great mode to shoot pictures of children in. I almost always take pictures of kids in this mode. It is easy to switch apertures quickly, versus manually adjusting everything in manual mode.
The Challenge:
Use your camera’s aperture priority mode to experiment with different apertures. Take a picture with a large aperture, and try taking the same picture with a small aperture.
Need inspiration? Since February is the month of love, try finding something pink or red to take a picture of.
Come back next Tuesday to link up and share your example of aperture.
If you have more questions about aperture, or even your camera, please feel free to ask any questions in the comments. They will all be answered!
© 2010, Food Fun Family. All rights reserved.


thanks for the tips on aperture, i have been wanting to get photos with better focus when the lighting isn’t the best!
love this!! i’m for sure going to have to come back and read this when i have a clear head. i got a d90 last year for my bday and still feel like i know nothing about it almost a year later!! thanks for the work of putting the tips together!!
Hmmm… Either you read my mind or my blog. ;) I’m definitely going to try and keep up with these challenges.
Thanks!! Don’t worry about “getting” it all at once. We’ll keep explaining it a little step at a time until hopefully you will get it all!
Yes, I completely agree. I have messed up plenty of group shots with a too-large aperture. There’s nothing more frustrating than thinking you’ve got the shot and then finding out after the fact that half the people are out of focus.
You CAN figure it out!! And you ARE a bright star. Not everybody is great at everything. :)
Thanks, Deb! I agree about the manuals. When I got my first SLR, I sat down with the BOOK it came with and was completely lost. Manuals aren’t for teaching you anything. They’re for showing you where to find buttons. :) I’m glad I could be some help.
That’s so funny! I’m off to read your post now! :)
Oooh, I have been looking forward to another lesson from you! I guess it’s just going to take time to remember it all and how all of these settings work together!!!!!
.-= Nicole´s last blog ..Winter Olympics =-.
Very cool! Great explanation of aperture complete with visuals!
well explained tutorial! :)
.-= Jess´s last blog ..Clean and Snow and a Poll =-.
Just twitted this turorial. Another great one. AV mode takes practice esp when you’re taking a group photo indoor. It takes lots and lots of practice and when you share the learning experience, that adds to the fun. Looking forward to the challenge. Now I have to find something red!!
.-= GrammieMommy´s last blog ..This Dog Whispers =-.
Lolli! What a great tutorial! I think even I can figure this out (and I am not the brightest star in the sky when it comes to photography)! Thanks!
.-= Kristina´s last blog ..“not me” Monday =-.
i just wanted to tell you how much i am enjoying your tutorials. i just got my new little jewel a few weeks ago and the manual is so daunting and classes are so expensive. i have found so much useful info on your site in such a short period of time… i haven’t put much of it into action yet, but it helps me to understand “the big picture”, if you will.
so anyway, thanks!
.-= deb williams´s last blog ..Teen Talk: Survivors’ Stories =-.
It is too funny that you posted this TODAY of all days!! Check out my latest blog post about changing my aperature! LOL
Sarah
A House On Fire
.-= Sarah´s last blog ..I Changed My Aperature! =-.
Thanks! I tried so many different things! I swear–I was never happy with my results. I finally got those pictures last night! And while they’re not perfect, I think they do show a decent difference between apertures. :)
I love that analogy, too. It’s those little things that have helped me understand the concepts behind photography so much better.
I know–the switch over to WP caused a lot of people to lose track of me. My blog stopped updating in people’s blogrolls, and dumped about 1000 subscribers. It was very sad. But I’m always so happy when people find me again!!
I’m so glad! I wish I could spend a day with you period! :) It was fun to chat this morning!!
Yay for working ahead! There’s no problem with that! I can’t wait to see what you come up with for the challenge (since you’ve had all this practice and all…..)
Aw I “heart” your picture!
.-= Beth´s last blog ..Aperture, a Bloggography Tutorial =-.
Love the eyes analogy…that really makes sense!
I am so glad I found you again! I lost track of you when your site moved, but it’s like perfect timing! I really needed this little lesson because I just got a new camera and I took your assignment seriously and ran to take some shots of the red tulips I got for Valentine’s Day! Thanks for the tips!
.-= Amy´s last blog ..Details =-.
Oh, how I wish I could just spend a camera day with you…or maybe a week. The way you explain things makes so much sense!!
.-= Cecily R´s last blog ..Photo Story Friday and Hey Mom? =-.
Not gonna lie I have been looking forward to this challenge. I have even been working ahead… I know it is really surprising. I cheated and called my babysitter/photographer and had her give me some pointers too.
.-= Brandie´s last blog ..Five Question Friday Vlog-style =-.
I’m so glad you came over for a visit! It’s not too common to find moms of 5. :) I hope the photography tips will help!
Your twitter name came up on SITS and caught my eye, as I also have 5 kids. I have always wanted to take better pictures of my kids, and know how to use my camera as more then just point-and-shoot. I am so happy I stumbled on your blog today, and will be coming back at naptime (when I can think) to read through your photography tips. Thank you!
.-= TornadoTwos´s last blog ..Dear Target =-.