Don’t know what bokeh is? Don’t worry, neither did I….until I did a little research. As most of you know, I am a self-taught photographer. I love to take pictures, but up to this past year, I knew next to nothing about the technical aspects of photography. I had a semi-fancy camera but kept it on auto (oh, the shame!). Haha! :)
So over the last several months, I have checked out as many books as I could from the library. I have scoured the internet for helpful sites and tutorials. And I have practiced. A lot.
A while ago, when I started looking for lens upgrades, I kept hearing people mention “good bokeh” as one of the qualities of a lens they were describing. I had to look it up. Actually, I had to look it up a few times before I really understood what bokeh really meant. I’m going to do my best to explain it here……
BOKEH comes from the Japanese word “boke”, meaning “becoming blurred or fuzzy.” The term has been used in photography since the 1960s, but was used in photography books starting around 2000 (see? it’s new! That’s why I didn’t know about it!). Basically, it refers to the blurry or out-of-focus background in a picture.
So, are you familiar with DEPTH OF FIELD? A photo with a SHALLOW depth of field will be focused only on a small portion of the the photo (usually….and, hopefully, the main subject). The background and everything else in the photo will be blurred, thus focusing the viewer’s attention more on the subject and blurring out unnecessary or distracting details. Like this butterfly in Belize:
 Or this. I took this picture as an experiment with monochromatic subjects (everything is the same color) for my photo group challenge. It’ not the greatest shot, but it’s a great example of shallow, or small, depth of field.
 Sometimes, however, you don’t want anything in the picture to be blurred. Like when you photograph the yummy food at a bridal shower. In that case, you go for a a larger depth of field, so that your subjects are in focus both close to the camera and far away. But I’m getting on a tangent. We were talking about bokeh, not depth of field. That’s another tutorial, and I could go on and on about DOF and apertures and all that..

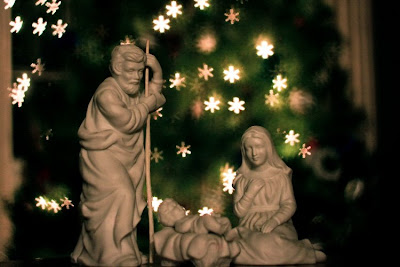
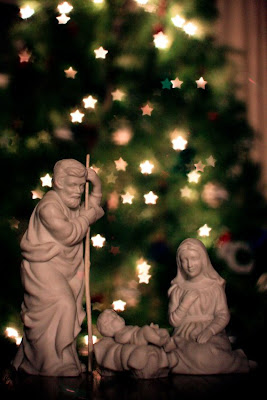
So are you curious now about my little experiment last night? When I was reading about bokeh a while back, I stumbled across the idea of creating SHAPED bokehs. It took several tries, but I finally came up with this: Star-shaped bokeh with the Christmas tree lights! And then this: Snowflake-shaped Christmas lights!
 You want to know how to do it? Easy! Well, it’s easy of you have the right equipment! I am very curious to know if this technique would work on a point and shoot camera. If you try it, let me know!! Here’s what you do.
1) Gather your camera and your lens with the smallest aperture (I used my 50mm f/1.8). You need the smallest aperture lens because you need the lens opening very wide. You might be able to do this with a point and shoot if your camera has the ability to manually change the settings (aperture and shutter speed).
2) Cut a small piece of paper just larger than the front of the lens. In the very middle, cut or hole-punch a shape. I have tried a heart, a star, and a snow flake. I used my scrapbooking craft punches.
3) Set up something you can focus on (in my case, I used a few nativity props) and set it up several feet away from a light source (like Christmas lights or candles). You can also create the effect without a prop close up. Just make sure that the light source is not in focus.
4) Set your camera on manual focus and, at the minimum, aperture priority. You will want your aperture, or f-stop to be at it’s largest (the smallest number–I know, it’s confusing!). I used f/1.8. Now, focus on your close subject.
5) When your shot is all set up, slip the little shape-punched paper in front of the lens. You should see the lights in the background change into the shape immediately. Move it around until the shot looks right and click away!
Here are a few more of my shots:


There you go! My first attempt at a tutorial. :)
© 2008 – 2013, Food Fun Family. All rights reserved.
Great post! I’m working on my photo skills. I want to pull my hair out most of the times. I’d love your opinion on this photo https://gonnawantseconds.blogspot.com/2010/03/chicken-marsala.html
I don’t get why its fuzzy. I have it on the same setting I always use and its fuzzy. I don’t get it. I think I’ll soon be bald!!!!!!!!!!!!
.-= Kathleen´s last blog ..Chicken Marsala =-.