Food Fun Family

A family lifestyle blog about food, family, entertainment, travel and family-friendly products.

  • Home
  • Food
    • All Recipes
    • Main Dishes
    • Desserts
    • Side Dishes
    • Vegetarian dishes
    • Delicious Dishes Recipe Party
    • Recipe Round Ups
    • 15 Minute Suppers
    • Recipe Box
  • Family
    • Tips for Moms
    • Family life
    • Holidays & Celebrations
    • Savvy Living
  • Creative Life
    • Crafts + projects
    • DIY Bath & Body Products
    • Printables and Activity Sheets
    • Photography Tutorials
    • Give Me Your Best Shot – Photostory Friday
  • Travel
  • Entertainment
    • Giveaways
    • Book Club
    • Movies
    • Printables and Activity Sheets
    • Blog prompts
  • About
    • Contact Me
    • Privacy Policy
    • Advertise
    • Site Map – Find Your Way Around
  • Lollidale Goats
    • Our Does
You are here: Home / Family life / How to Create a Festive Facebook Cover Photo Collage with PicMonkey

How to Create a Festive Facebook Cover Photo Collage with PicMonkey

Friday, December 7, 2012 by Lolli 3 Comments

As a photographer, I own and know how to use Photoshop….and yet when I want to make an image Pinterest-friendly by adding a title with fun fonts…or when I want to edit a photo while I’m on the road, I always turn to Picmonkey. In fact, I’m there almost every day. Why would I NOT take advantage of a photo-related site that is so easy to use AND FREE?!

Just last night, I designed a Christmas card for a friend of mine by using the Winter-themed overlays and fonts on Picmonkey. I was so inspired that I decided to create myself a new and festive Facebook cover photo for Better in Bulk’s fan page.

Facebook PicMonkey collage for Better in Bulk

Not only am I enjoying my new cover photo, but I’m determined to keep updating my photo to fit with the current season. Now that I know I can…why not?

How to make a Facebook cover photo collage with Picmonkey

  • Gather photos – I wanted to find some of my favorite Instagram photos from 2012 to do a year-in-review type collage. I saved the photos in a folder on my desktop so I had them all in one place before I got started.
  • Go to Picmonkey.com and click on “Create a Collage.”

winterland theme on Picmonkey

  • Add photos – On the left of the page, look for a box that says “Open Photos.” Click that and select all of the photos that you’d like to use in your collage.
  • Create your layout – You’ll see a generic collage in your “workspace.” Click the second icon down on the left-most side of the page. You’ll see a bunch of layouts. Picmonkey has some ready-made Facebook templates that you can use (just look for the box that says “FB Cover”). I used “Square Deal” because I wanted to add more photos.

Picmonkey Winterland collage square deal

  • Make sure your image is the right size – if you use a different sized layout like I did, you’ll need to adjust the size so that it fits the Facebook cover photo space. Your image should be approximately 851 x 315 pixels. Don’t worry – in Picmonkey, it’s super easy to change the size. Simply drag the bottom of the image “up” until you reach 315 pixels, and then do the same with the sides (drag the left edge to the right until it’s 851 pixels). If it’s a pixel or two off, that’s totally fine.

adjust size in Picmonkey

  • Change the background – Click on the very last icon on the left side of the page (the one that looks like an artist’s palette). I reduced the spacing between the images and then chose a background color (just use the slider to find your perfect shade).

change image background in picmonkey

  • Add textures – Picmonkey has several Wintery-fun textures (like pretty papers). I added a bunch throughout my collage. You can add textures to any of the available boxes in your layout OR anywhere within your image. Just drag the texture you want to use to your image-in-progress and you’ll be able to see where you can insert it.
  • Adjust! – I moved my columns and rows around (hover over your image and you’ll see where you can slide to make your boxes bigger or smaller.

add textures to image in Picmonkey

  • Add photos to your collage! This is where I added my images. I went back up to the Photos tab and inserted my pictures by hand, but you can also click “Autofill” right above your workspace and Picmonkey will add your photos for you (don’t worry – you can always change where your pictures go).
  • Save your work – At this point, I saved my photo using the Save button above my workspace.
  • Return to the main Picmonkey.com – Now click “Edit a photo” and chose the image that you’ve just been working on. Here’s where it gets really fun!

add text to image in Picmonkey

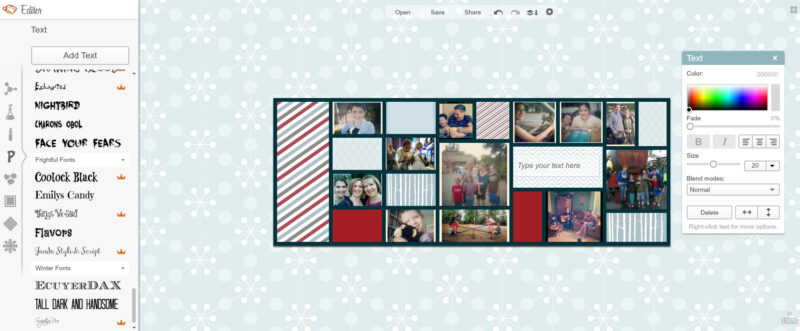
  • Embellish – Click on the “P” icon on the left side of the page and click “Add Text.” A text box will appear on your image. Click within the text box and type your message. You can adjust the font (I love Picmonkey’s fonts, especially the seasonal options!), the size and color of the text, and the location of your message. Next, add some seasonal embellishments (check out the Winterland section by clicking on the snowflake on the left). Just like the text, you can change the size, color, opacity, and location of any of the overlays.
  • Save and share! And then upload it to your Facebook page and wait for the complements to come rolling in!

Connect with Picmonkey

  • Picmonkey site
  • Picmonkey blog
  • Picmonkey on Pinterest
  • Winterland creations on Pinterest

Note: I was inspired to create this festive Facebook cover photo in connection with a compensated campaign with Picmonkey, but all ideas and photos are my own.

© 2012 – 2013, Food Fun Family. All rights reserved.

About Lolli

Lolli has written 3740 post in this blog.

I became a mom in 1996, and in 2005 I had my fifth. Yes, 5 kids. In 2007, this blog was born (my 6th baby that will never grow up) and I've been sharing recipes, photography tricks, parenting tips, and everything in between. (Formerly Better in Bulk)

  • View all posts by Lolli →
  • Blog
  • Twitter
  • Facebook

Filed Under: Family life, Holidays & Celebrations, Photography, Tutorials Tagged With: Christmas, Holidays & Celebrations, Photography, tutorials

« SeaWorld Orlando – #PSF Give Me Your Best Shot
The Bucket List I Never Knew I Needed to Write »

Comments

  1. Jennifer Sikora says

    Monday, December 17, 2012 at 10:36 pm

    Thanks for sharing this. I am going to use it to try and make a header for my blog.

  2. Susi says

    Friday, December 7, 2012 at 11:15 pm

    I love picmonkey and have been using it for quite some time. I make a collage pretty much once a week for one of my photo link-ups. It is soooo much fun to use! :)

Trackbacks

  1. LDS Tribes says:
    Tuesday, January 29, 2013 at 9:59 pm

    […] How to Create a Festive Facebook Cover Photo Collage with PicMonkey […]

Leave a Reply

Your email address will not be published. Required fields are marked *

This site uses Akismet to reduce spam. Learn how your comment data is processed.

  • Facebook
  • Google+
  • Instagram
  • Pinterest
  • RSS
  • Twitter

Copyright © 2025 · Foodie Pro Theme by Shay Bocks · Built on the Genesis Framework · Powered by WordPress

This website uses cookies to improve your experience. We'll assume you're ok with this, but you can opt-out if you wish.Accept Read More
Privacy & Cookies Policy

Privacy Overview

This website uses cookies to improve your experience while you navigate through the website. Out of these cookies, the cookies that are categorized as necessary are stored on your browser as they are essential for the working of basic functionalities of the website. We also use third-party cookies that help us analyze and understand how you use this website. These cookies will be stored in your browser only with your consent. You also have the option to opt-out of these cookies. But opting out of some of these cookies may have an effect on your browsing experience.

Necessary Always Enabled

Necessary cookies are absolutely essential for the website to function properly. This category only includes cookies that ensures basic functionalities and security features of the website. These cookies do not store any personal information.

Non-necessary

Any cookies that may not be particularly necessary for the website to function and is used specifically to collect user personal data via analytics, ads, other embedded contents are termed as non-necessary cookies. It is mandatory to procure user consent prior to running these cookies on your website.