Does your kids’ crayon collection look something like this?
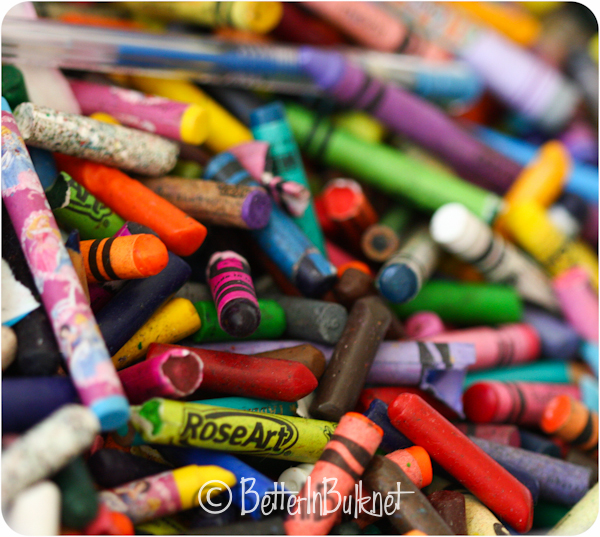
Each August I buy a new set of crayons for each of the kids to take to school, along with a few extras to keep at home. At the end of the school year the crayons return home and are dumped in the big crayon bin. If pieces of crayon are found on the floor or in the bottom of a bag, I’ll toss them out but for the most part the collection just continues to multiply.
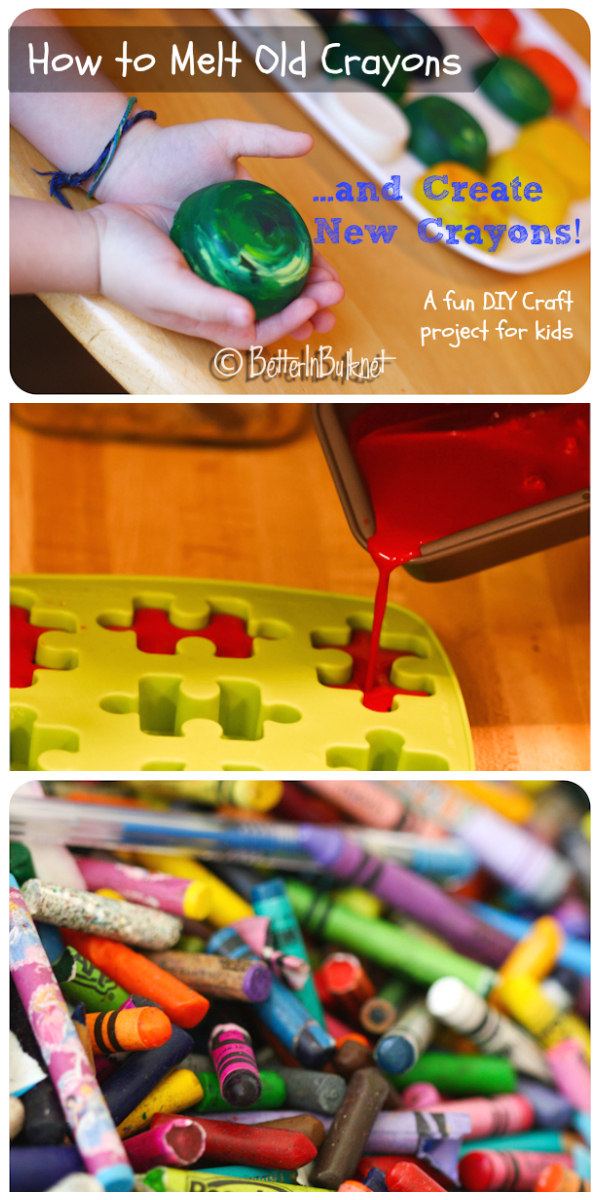
I decided that it was time for us to do something with the crayons. They had become out of control. I had heard about melting crayons, but had never tried it before.
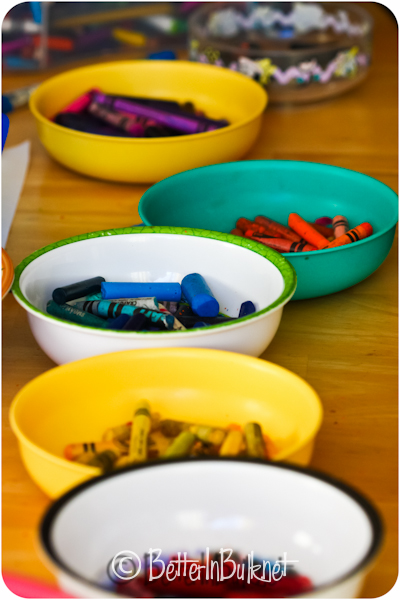
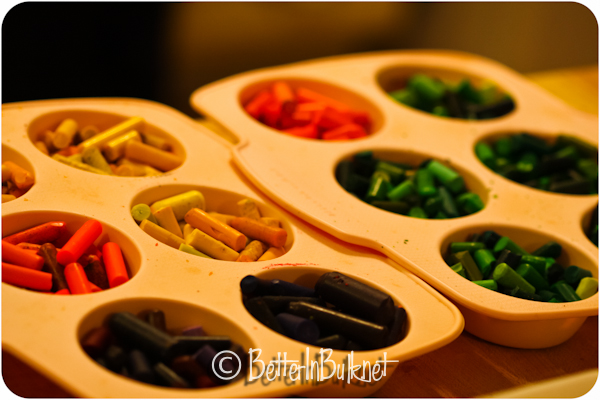
As soon as the kids came home from school on Friday, we proceeded to sort the crayons (and markers and colored pencils that were mixed in the bunch). Crayons that were in good shape were put into a large ziploc bag to hold on to. All others were sorted by color into small bowls.
I gave AJ the task of peeling the papers off the crayons because it’s one of his favorite things to do during church. Who would have guessed that the paper-peeling would turn out to be the most difficult part of the whole project? We ended up with lots of crayon under the finger nails, as well as several under-the-nail paper cuts. Ouch!
After sorting and peeling papers, the fun part began! We melted crayons two ways.
Crayon-Melting Method #1:
Place similar-colored crayons in an oven-safe container (we used mini bread pans). Put the pans in a warm oven (250-300 degrees) and check periodically. I stirred the crayons occasionally.

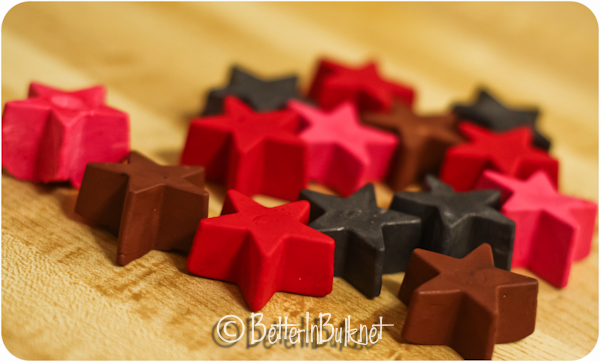
When the crayons are melted, grab the pan with an oven mitt and quickly pour the hot wax into shaped molds (we got our fun shapes at Ikea). The wax starts to harden very quickly. To speed up hardening, place the molds in a cold place (outside or in the fridge).

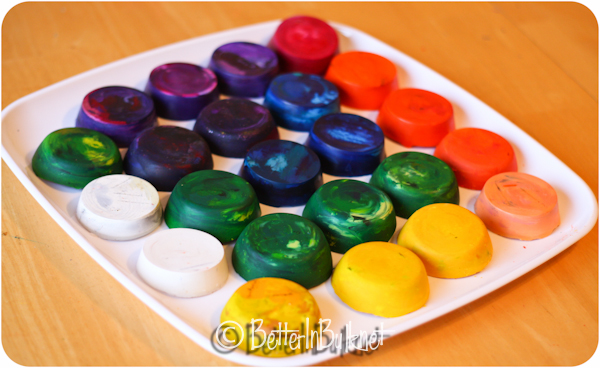
Remove your new crayons from the molds when completely cooled.

What I learned:
- Clean-up is a pain in the toosh. I would recommend using disposable pans if you’d like to do this. I’m still not sure if my molds will be usable for ice cubes again. They are very difficult to clean, and wax does not come off easily. Lesson learned.
- Apparently, there are some crayons that will never melt. As seen in the right picture above, there were always a bunch of unmelted crayons in the bottom. Toss them.
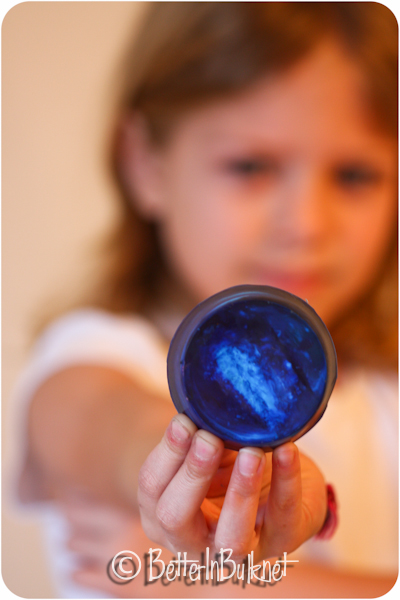
- Was it worth it? Yes! The kids love the fun shapes and they are all eager to show off their puzzle crayons when they head back to school on Tuesday.
Crayon-Melting Method #2:
Sort crayons directly into muffin tins (I used my silicone muffin pans). Break crayons into smaller pieces and fill each hole pretty full.
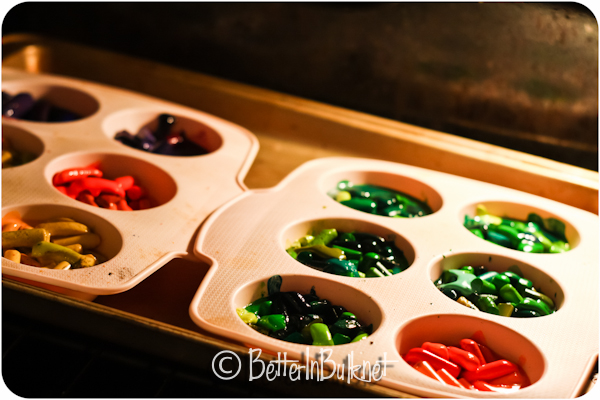
Stick the muffin pans into a warm oven (250-300 degrees) and heat til the crayons are melted. Stir the melted wax and then place in a cool spot until the wax hardens and completely cools.
What I learned:
- Because I used silicone muffin pans, I was able to simply and easily “pop” each new crayon out. I’m guessing that getting the crayons out of a regular muffin pan could be difficult to impossible.
- This method was so much easier and faster and way less messy. However, the kids were not as excited about the round crayons.
- Need a point on your muffin crayons? Just break one in half, and you’ll have a few nice points and edges.
After we were done with our project (several hours later) I noted a few additional things:
- We had so much fun together. It has been a while since my kids were so enthralled my a project, and since an activity held their attention for so many hours. Regardless of how much we use these new crayons, everyone loved creating them together. There was something that everyone could do. It was definitely something that needed a “bigger hand” (especially when it came to handling the hot wax), but the sorting and peeling and breaking were easy enough for little hands, too.
- We created a much bigger mess than I would have anticipated. If we do it again, we’ll be using the same supplies, because frankly, I’m not sure if I’ll be able to use some of them for anything else. The easiest pan to clean was a pyrex bread pan. The hardest? Silicone, for sure.
© 2011 – 2016, Food Fun Family. All rights reserved.
I got all of my molds at Ikea a while ago. I’m not sure if they still have them there, but I did find them on Amazon: https://bit.ly/waterbottleice They’re actually ice cube trays that are made for water bottles. Pretty cool, huh? :)
Where did you get the pencil-shaped molds for remaking color crayons?
I saw this post on your sidebar and I love your tutorial! The puzzle pieces are so awesome. Thanks for sharing!
a few helpful hints! I just made a bunch of train and #3 shaped crayons for my sons birthday party as favors. If you intend to pour the wax, melt it in a clean tin can and a pan of water (like a double boiler) the can is not too hot to handle and you can use pliers to bend a pour spout into one side. this worked fantastically. Also, if you are pouring, get chocolate candy molds. the hard plastic ones, the crayons are on the smaller side BUT they pop out easily and you end up with very few broken shapes. keep in mind the more intricate the more likely to break, I was also able to create fun tye die and duo crayons by pouring a small amount of each color one at a time and letting it harden before adding another color. again, remember that color wheel! mixing a bunch of colors willy nilly will yield you brown or black rather than a fun rainbow!
my 12 year old LOVES to do this! She came up with this on her own because she loves reading “Box Car” children books and loves trying to make “home made”, every day useful items the way the children did in the books. My daughter uses wax paper boxes that she makes by taping pieces of wax paper together and then she lets them melt in the sun, the crayons come right out and then she just throws away the used wax paper. Easy clean up, I LOVE it, no mess!
100% the best way to do this!
https://www.youtube.com/watch?v=qQFiEYvmaaQ look at this video on how to melt crayons
I just tried this and after reading how hard some had it getting the crayons to come out afterwards, I decided to experiment with putting paper baking cups in the muffin tin. It worked perfectly! After freezing them the paper peeled right off and left a cool looking scalloped pattern on the edge that also makes them more fun to color with at the very beginning. Thanks Lolli, for giving such great info and for everyone else who shared their stories, it was an inspiration!
u should it it the sun and tell what is your data and observations be4 mi science fair project jan.14,2012 and the pictures so i can understand
good
hi
I did similar using ice cube trays to melt wax in, and thought i’d washed them thoroughly, until a summer day came and I had guests, so made nice cold drinks with ice cubes, sadly when they melted there was a thin layer of floating wax in everyones drink. eurgh.
I have a reg. baking pan that makes fingers & would like to use it to melt our crayons it is not silcone it is a cake pan will it still work? do i need to spray pam first?
I made these in a heart shaped metal muffin pan. After letting them cool, most popped out of the tin on their own. For the ones that didn’t, I stuck the pan in the frezer for a few minutes and they came out.
Hmm. When I used to shaped IKEA trays, I melted the crayons in a regular bread pan and then poured them in (that was my “method #1”). When I tried “method #2” I melted the crayons straight in the muffin tray only. And those were really easy to pop out because the muffin cups are much more pliable. Maybe the fact that the IKEA trays were heated along with the crayons made them “stick” more??
I used the silicone ice tray from IKEA – did you? I actually just melted the crayons IN the mold in the oven at 250 – took a little while! Maybe it’s somehow different if you don’t put the silicone tray in?? Who knows. I might try again with a little cooking spray… they are too cute to give up so easily!
Kat, what kind of mold did you use? Since we were using silicone molds, the hardened crayons just popped out. I didn’t have any break. I can imagine that it would be very difficult to get cooled/hardened crayons out of a hard, non-pliable mold. I wish I could help more!
Any suggestions for getting the puzzle piece crayons OUT?? Mine had to be broken out… tried straight from the freezer, then at room temperature – all BROKEN! Any ideas?!
Any tips for getting the puzzle piece crayons out?? I cracked every single one of mine! Tried from the freezer, then at room temperature… all broken!
Hello!
I’m doing this as a Valentine’s Day gift for my students and wanted to share a crayon-peeling secret I read on another site. Fill a bowl with the hottest water you can get from your tap, soak the crayons immediately. In just a few minutes you will notice the crayon wrappers popping off on their own! If the water begins to cool before all of the wrappers come off, remove the “naked” crayons and drain. Refill with hot water and repeat.
Happy crafting!
Lori
Gonna make heart shaped ones to give as Valentine’s treats in lieu of candy! Thanks.
Just wanted to let you know that the IKEA icecube trays can go in the oven at the 250. I just did this myself and tested it first and it worked great. You just have to make sure that you cram as much crayon in as you can as it melts and is only filled about half way up. Just thought I would share to help
Melting time is about 15 minutes in 250 degree F oven.
We used individual Wilton silicone hearts ($10 at Michael’s) for the forms and could place each one in the freezer — about 10 min to harden through. These also make it super easy to remove.
Hey Ladies!
I am currently in the process of doing this!!! They are in the oven now! I found an easy way to get the crayon wrappers off (adult required). A fruit peeler does wonders! And speeds up the process so much!!! I thought of this halfway of peeling my 8 boxes of crayons.. hhaha!
Best of luck!
Soak the crayons in a bowl of warm water for an hour – labels come off much easier than picking with fingernails!
I actually just did this project for my daughter’s pre-school class Christmas party. I used my regular nonstick cooking pans. I made multi-colored ones. The trick is when using a metal pan, you have to spray your pan with Pam or other non-stick spray before you put the crayons in. Also as soon as you take them out the oven, put them in the freezer. They popped right out. I didn’t need anything to pry them out or anything, I had to tap on the pan maybe once or twice in the 6 batches that I made.
CRAYONS ARE BEAUTIFUL
We did this a few years ago and now I need a buckle for a Halloween costume. Crayons to the rescue! I’ve used small metal tart pans and they work great. No problem getting them out of the mold–simply put them in the freezer for 10 minutes or so and they’ll pop right out.
My kids love everything tie-dye so this just adds to their creativity! Enjoy!
I’ve been meaning to try this! Thanks for doing it first! Great idea and I love that you forewarned about the mess. I’ll be heading to Ikea for some silicone ice cube trays before I tell the kids about this project!
Those fine motor skills are needed to take off that paper. I have seen many kindergarten children get so frustrated taking the paper off because their fine motor skills have not developed. It’s really good practice for this age, although I know a bit complicated because fingernails are needed. Other things to do to help these fine motor skills are to cut magazines/paper/newpaper using child scissors, using tongs to move cotton balls/pebbles/q-tips from one bowl to another or even using tweezers to move smaller objects. Once they accomplish this skill, they really have fun.
Wow! What a great tip. I would have thought that using anything oily would mess up the wax. I would love to be able to save on the clean-up, though!!
If you put some vegetable oil on a cupcake pan it works great, they slide right out with a hit of the back of the pan and leave little to no mess! I just got done making some! :)
Oooohhh! So cool! Love the pics of your new crayons.
I was also told you can microwave them or add glitter to them too, but was advised not to put the glitter in until AFTER the melted crayons come out of the micro of course. :)
I need to do this though. My 3yo had a thing for destroying crayons. lol
We’re making these in heart shaped silicone muffin pans I got from Target. William (4) is giving them to his schoolmates for Valentine’s Day! Such a neat idea! We don’t have the crayon stash you do, tho. I actually had to buy crayons for this.
You are so awesome. I love this activity! The puzzle and stars crayons are SOOO cute!
Fantastic idea. I’ve done this with candle wax but never thought of doing it with crayons.
I can not wait to try this with the kids!!
Great post, I need to do this. I have a basket full of broken crayons.
Oh! And the peeling. I discovered that if you take a box cutter and slice the paper from top to bottom the paper just pops right off. Since you’re melting the crayon anyway there’s no harm done by cutting them a bit.
Just a hint for next time!
What an awesome project and an awesome post! LOVE it!
Did this with kids I nannied for b/c I wanted to recycle the broken crayons, what a great idea, and love love your steps and pics!!
Great write-up! I love your photos and lessons learned! I am definitely going to buy some disposable or cheap-o molds and pans if I ever do this!
How fun! We have hoards of crayons too. I usually just throw them all away guess I will try to be more creative haha!
Totally love this post. Can’t ever repeat it, or I’ll have to change the name of my blog. :-)
I did this using baby food jar lids to melt the crayons in, but I am in love with your puzzle piece crayons…fun to color and assemble!
I’ve seen this idea before but never like this!! Love the puzzle pieces and the stars are great. Bookmarking this for later as I’m sure we’ll need it!
Such a fun idea! I love the puzzle:-)
The puzzle pieces are adorable.
I am going to have to remember this, we don’t have quite that many crayons….YET!!!
What fun!
I think the best part is how much fun you had with your kids. It sounds like they really had a great time!!
I love this idea! Puzzle pieces are def my fav! Cannot wait to try it out.
I just adore the puzzle piece shaped ones, how fun! And yes the peeling part is definitely THE worst step!