Food Fun Family

A family lifestyle blog about food, family, entertainment, travel and family-friendly products.

  • Home
  • Food
    • All Recipes
    • Main Dishes
    • Desserts
    • Side Dishes
    • Vegetarian dishes
    • Delicious Dishes Recipe Party
    • Recipe Round Ups
    • 15 Minute Suppers
    • Recipe Box
  • Family
    • Tips for Moms
    • Family life
    • Holidays & Celebrations
    • Savvy Living
  • Creative Life
    • Crafts + projects
    • DIY Bath & Body Products
    • Printables and Activity Sheets
    • Photography Tutorials
    • Give Me Your Best Shot – Photostory Friday
  • Travel
  • Entertainment
    • Giveaways
    • Book Club
    • Movies
    • Printables and Activity Sheets
    • Blog prompts
  • About
    • Contact Me
    • Privacy Policy
    • Advertise
    • Site Map – Find Your Way Around
You are here: Home / Family life / Holidays & Celebrations / NOEL Blocks Christmas Craft

NOEL Blocks Christmas Craft

Monday, November 24, 2014 by Lolli 21 Comments


Earlier this month, my daughter and I joined a few friends for a Christmas craft night and had an absolute blast crafting together (I don’t do it often enough!). Last week, I shared the super-easy Christmas Countdown Whiteboard craft and today I’m excited to share how we made these cute Noel blocks.

DIY Noel blocks Christmas craft

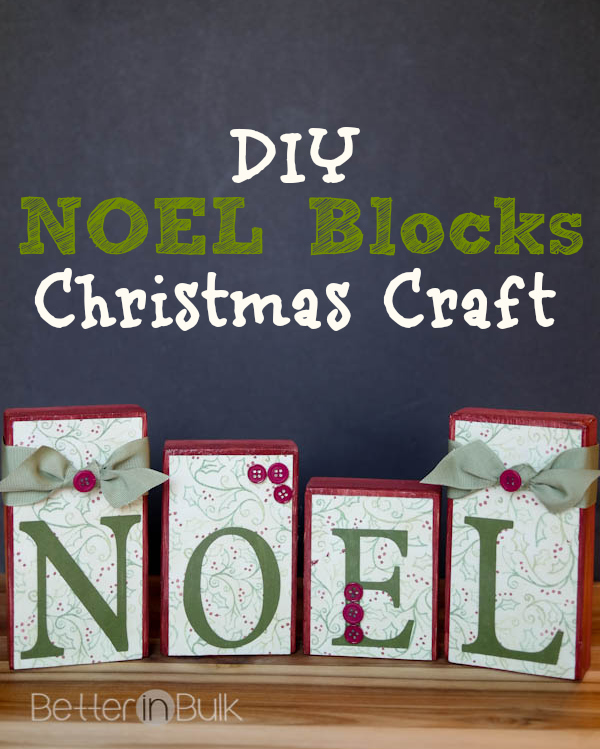
How to make Christmas Noel Blocks:
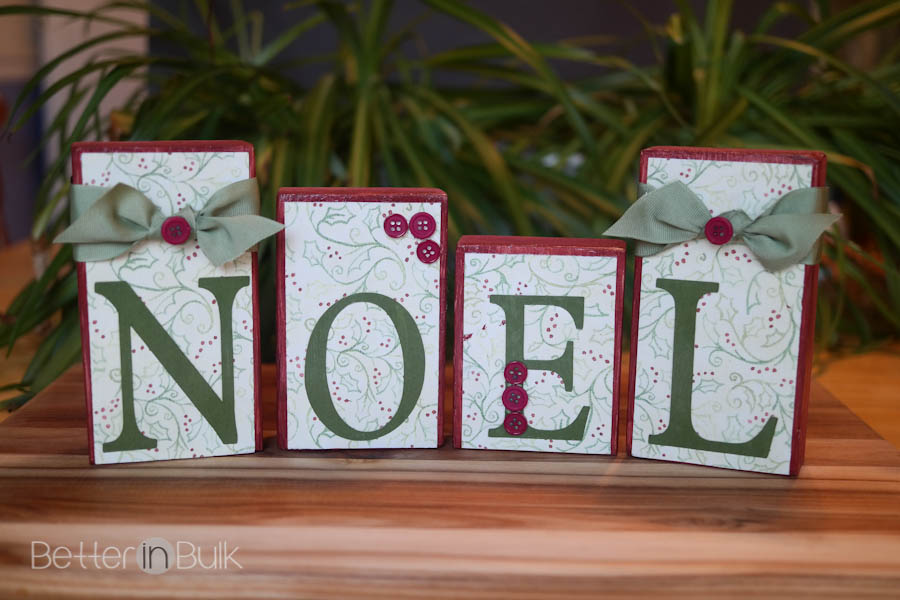
Supplies:

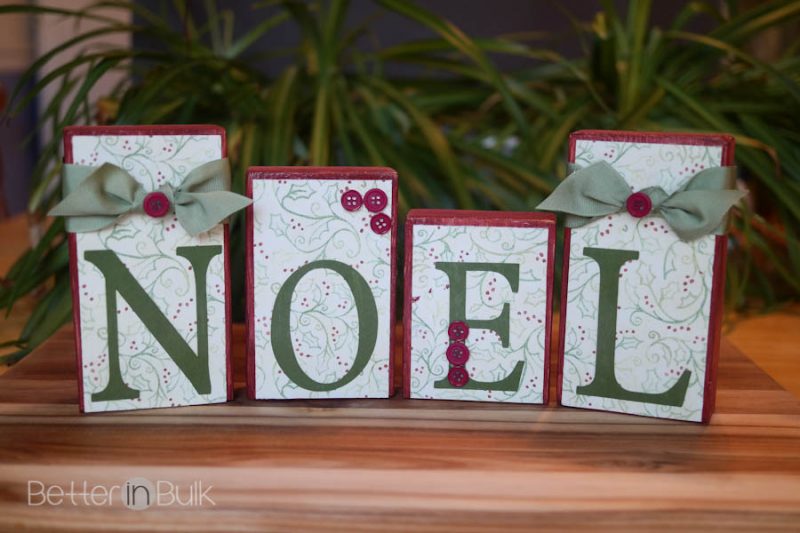
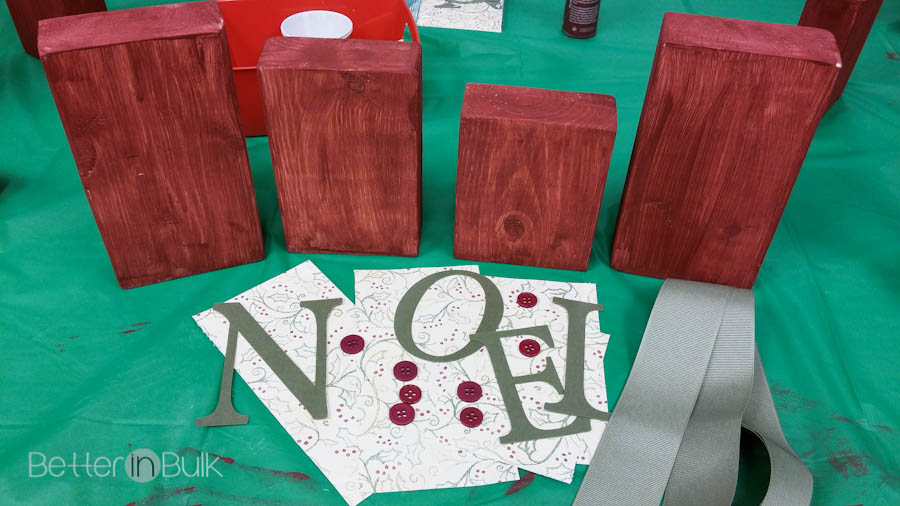
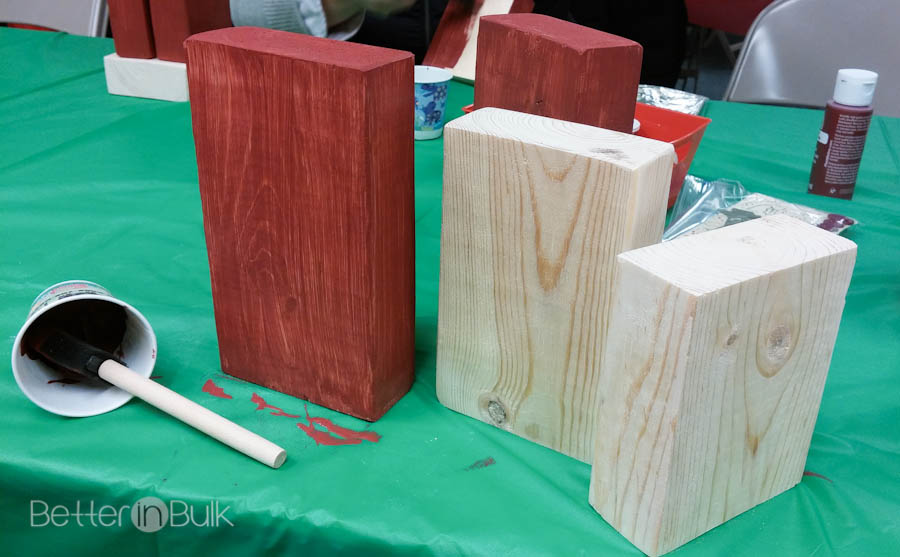
  • 4 pieces of 2×4 wood blocks of various heights (mine were 4 1/2 inches, 5 1/2 inches, and two 6 1/4 inches), sanded
  • 4 pieces of festive scrapbook paper, cut slightly smaller than the wood blocks
  • NOEL Christmas Craft

  • Acrylic paint
  • 2 foam craft brushes
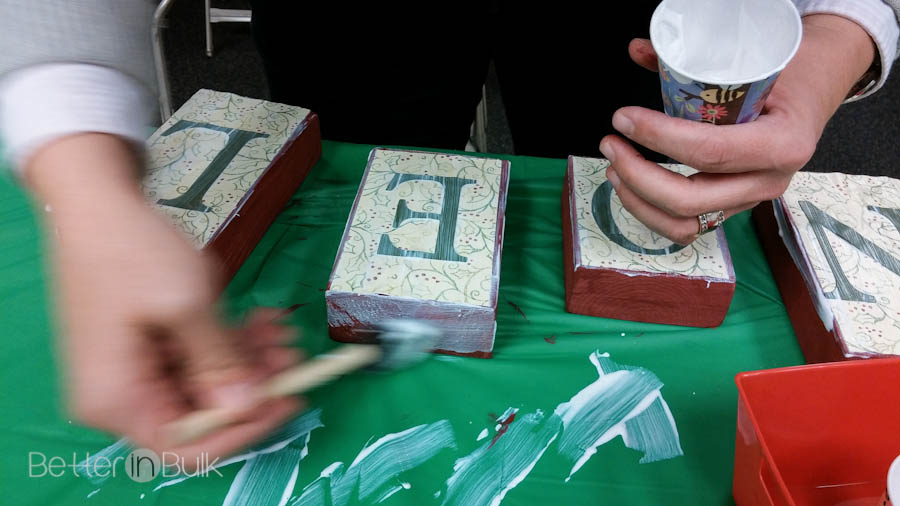
  • Die cut letters: NOEL
  • Buttons (I used 8)
  • Ribbon (cut to fit your blocks)
  • Mod podge
  • Hot glue gun and glue

NOEL Christmas Craft

Instructions:

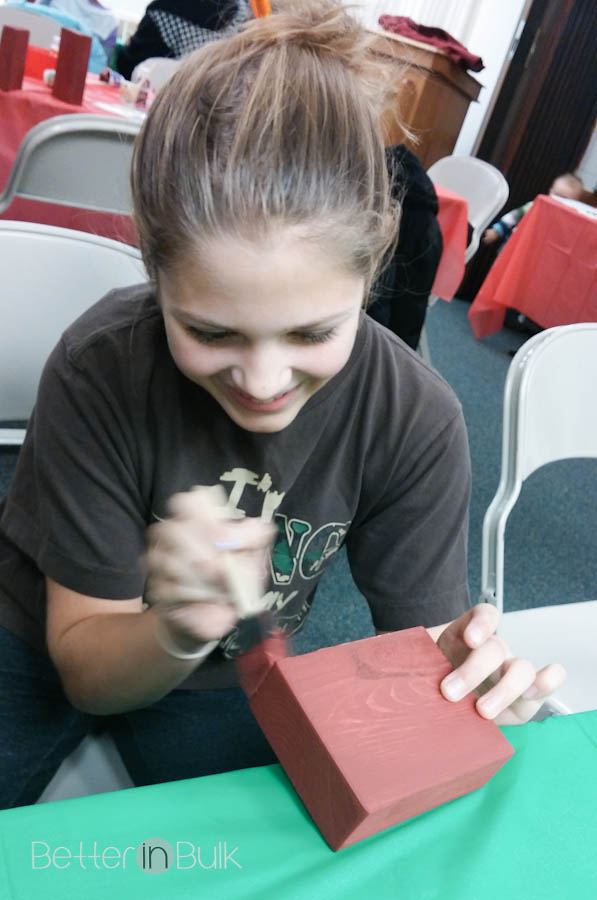
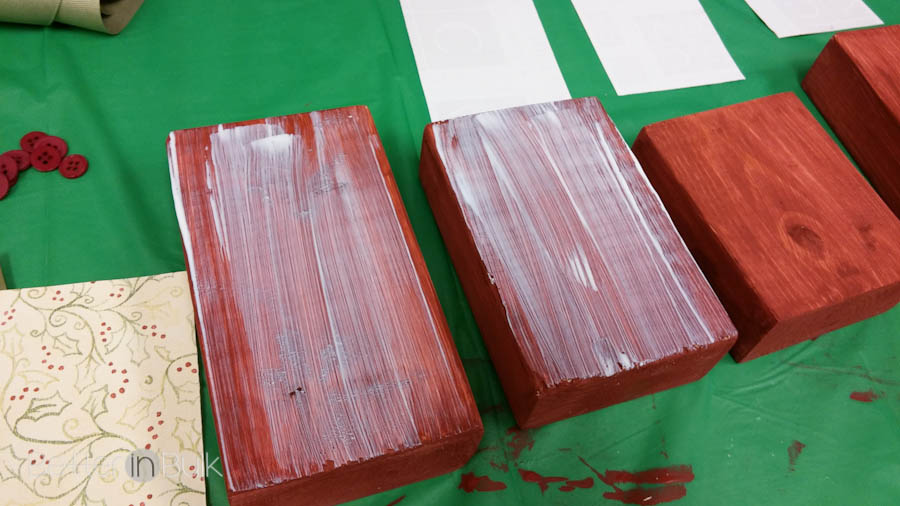
  1. Paint all sides of your blocks and allow to dry.
  2. NOEL Christmas Craft

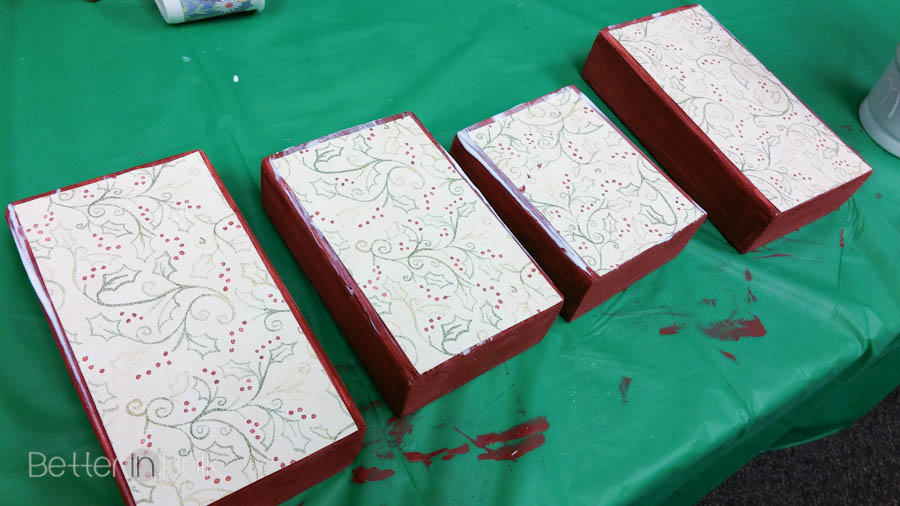
  3. Using a fresh brush, paint one side of each painted block with a thin layer of mod podge. Place scrapbook paper on top of wet mod podge and press down to smooth. Paint more mod podge onto the back side of each of the letters and adhere to the scrapbook paper.
  4. NOEL Christmas Craft

    NOEL Christmas Craft

  5. Cover the entire block front with more mod podge to seal the paper and letter to the block, making sure to smooth out any bubbles or bumps that may appear. It is not necessary to cover the rest of the block with mod podge, but you may want to paint a single layer over the entire block for an even finish.
  6. NOEL Christmas Craft

  7. When the mod podge is dry,  add buttons using a hot glue gun. Tie ribbons on the tops of the tallest blocks and trim the edges.

NOEL Christmas Craft

That’s it! It’s so easy! Your blocks can be any size you like (I just added the size I used above), any color (or colors) you like to match your decor. Heck, you could even add more blocks to create different word combinations.

NOEL Christmas Craft

Enjoy….and Merry Christmas!

© 2014, Food Fun Family. All rights reserved.

About Lolli

Lolli has written 3741 post in this blog.

I became a mom in 1996, and in 2005 I had my fifth. Yes, 5 kids. In 2007, this blog was born (my 6th baby that will never grow up) and I've been sharing recipes, photography tricks, parenting tips, and everything in between. (Formerly Better in Bulk)

  • View all posts by Lolli →
  • Blog
  • Twitter
  • Facebook

Filed Under: Holidays & Celebrations, Projects and crafts Tagged With: Christmas, Christmas crafts, crafts, holidays, projects and crafts

« Who Needs Sleep? Sleep Quotes and #PSF
Thankful Turkey Thanksgiving Craft »

Comments

  1. Melissa French, The More With Less Mom says

    Monday, December 15, 2014 at 8:59 pm

    I love that holly paper, it’s so pretty. Thanks for posting. Hello from Busy Monday.

  2. Lou Lou Girls says

    Monday, December 15, 2014 at 3:59 pm

    So cute! Pinned and tweeted. Lou Lou Girls

  3. Sandra Lynn says

    Monday, December 15, 2014 at 7:26 am

    As someone mentioned above, you did make this seem incredibly easy – even I could do it ;) YAY! Thanks for sharing such a crafty cute idea :) Happy Holidays :)

  4. Christine says

    Friday, December 12, 2014 at 9:54 pm

    Very pretty blocks! Pinned! Thank you for the great tutorial!

  5. Christine says

    Friday, December 12, 2014 at 9:50 pm

    Very cute blocks! Pinned! Thank you for the great tutorial!

  6. Sue at the Little Shack says

    Friday, December 12, 2014 at 12:14 am

    These are so cute! I love them! Going to pin for next Christmas….I’m running outta time this year! :). Thanks for the tutorial! Found you over at the Weekend reTreat Link Party!

  7. Antonella says

    Thursday, December 11, 2014 at 9:46 pm

    Such a cute idea. Love the paper that you have used, and the different size blocks.
    I linked over from the “Craft Frenzy Friday Link Party” where I am participating too. Would love it if you’d stop by.
    Hugs,
    Antonella
    http://www.quilling.blogspot.com

  8. Mrs Major Hoff says

    Thursday, December 11, 2014 at 12:02 am

    Great tutorial! Super cute blocks!

  9. Cathy says

    Sunday, December 7, 2014 at 11:55 am

    Love this idea – so cute and simple. Thank you for sharing it with us at Share It One More Time. Cathy

  10. M.Clark says

    Friday, December 5, 2014 at 12:51 am

    I love this craft, I think those blocks look great, they look store bought.. Thank you for sharing this craft, it’s definitely something I’d like to try.

  11. Laura B. says

    Monday, December 1, 2014 at 4:06 pm

    This is so cute, I’m going to have to try it! You make it look easy!

  12. Janet W. says

    Monday, December 1, 2014 at 9:57 am

    What a cute idea! These would look great up on our mantle!

  13. Karen Glatt says

    Sunday, November 30, 2014 at 2:07 pm

    These are so pretty! I would love to make the Noel and make one with the word Joy to go with it. Your Noel Blocks turned out awesome! I would love to make them!

  14. Pam S says

    Saturday, November 29, 2014 at 8:24 pm

    I’d love to do this project with my granddaughter. Thanks for the fun!

  15. Crystal says

    Wednesday, November 26, 2014 at 9:30 pm

    These are absolutely adorable!! I love them!! Thanks for the tutorial!!

  16. Heather says

    Tuesday, November 25, 2014 at 9:16 pm

    These blocks are so cute! This is the kind of craft that I like to do. Nothing all that complicated but beautiful in the end!

  17. Cynthia R says

    Monday, November 24, 2014 at 11:30 am

    What a beatiful craft project, perfect for project to do during thanksgiving break with the kids and gets them in the mood for the holiday!

Trackbacks

  1. Best Recipes & DIY Projects Link party #75 | Mandy's Recipe Box says:
    Saturday, December 20, 2014 at 2:23 pm

    […] Noel Blocks from Better in Bulk […]

  2. Super Saturday #75 and Homemade Christmas Decor - Cooking With Ruthie says:
    Friday, December 19, 2014 at 7:29 pm

    […] Noel Blocks from Better in Bulk […]

  3. Best Recipes & DIY Projects Link Party #75 - Made From Pinterest says:
    Friday, December 19, 2014 at 7:00 pm

    […] Noel Blocks from Better in Bulk […]

  4. Busy Monday 144 | A Pinch of Joy says:
    Sunday, December 14, 2014 at 2:31 pm

    […] Feather Wreath    A Cultivated Nest – Gingerbread Puppy Chow   Better in Bulk  — Noel Blocks Christmas Craft      Yesterfood – Wine Bottle Gift Bags  Grab a Featured Button from the Button Box! Tab […]

Leave a Reply Cancel reply

Your email address will not be published. Required fields are marked *

This site uses Akismet to reduce spam. Learn how your comment data is processed.

  • Facebook
  • Google+
  • Instagram
  • Pinterest
  • RSS
  • Twitter

Popular Posts

Easy Chicken Caesar Salad Pinwheels
How to Organize a Desk
How to Grocery Shop to Avoid Processed Foods
LDS General Conference Activities for Kids #LDSConf

Copyright © 2023 · Foodie Pro Theme by Shay Bocks · Built on the Genesis Framework · Powered by WordPress

This website uses cookies to improve your experience. We'll assume you're ok with this, but you can opt-out if you wish.Accept Read More
Privacy & Cookies Policy

Necessary Always Enabled