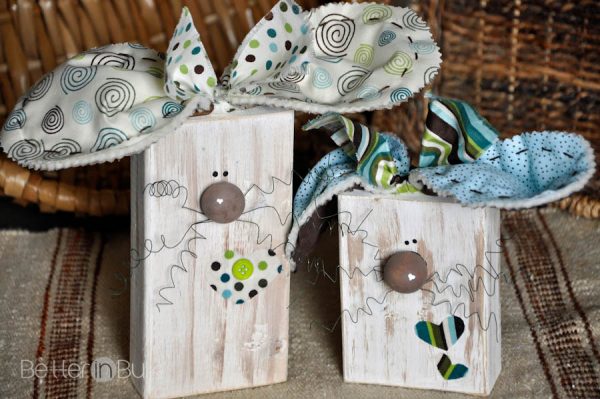
Love these cute Chunky Bunnies? Here are the printable directions to make it easier to take this project offline. Want to see the visual directions with lots of pictures? Head back HERE.
How to make Chunky Bunnies: a DIY Spring Craft
Note: I’ve used Amazon affiliate links below
- 2x4 blocks of wood cut at different lengths
- Sand paper
- White and brown acrylic paint
- Sponge brush
- Wooden balls for nose
- Wood glue
- Fabric scraps
- Batting
- Pinking shears and/or scissors
- Embroidery floss
- Wire
- Mod podge
- Wax paper
- Pencil and Black marker (like a Sharpie)
- Needle and pins
- Wire cutters
- Hammer and nails
- With a wet sponge brush, give your blocks of wood a light white wash. I like to paint (and dry) on a large piece of wax paper.
- While your blocks are drying, paint your wooden balls brown.
- While the brown paint is still on your brush, lightly streak your blocks of wood.
- Sand all edges with sand paper.
- Glue balls to blocks of wood, a couple of inches from the top.
- Draw dots for eyes with black marker.
- Twist 3 long strands of wire around the ball, with similar lengths extending on each side for the whiskers. Wrap the wire whiskers around a pencil to make them twisty and kinked.
- Cut small hearts out of your fabric scraps and attach them to the wood with mod podge on both sides. Let dry. You can add buttons or any other decorations to make your bunnies unique.
- Print and cut out the bunny ear pattern. Pin the pattern to the fabric you're using for the ears (two pieces of fabric plus batting for each ear).
- Layer fabric as follows: bottom (right side down), batting, top (right side up).
- Sew the ears together using all 4 strand of a length of embroidery floss. Use long, visible stitches. Secure with a knot.
- Attach a contrasting fabric as a ribbon by pinching the center of the ears and tying it on (this pice of fabric can be frayed or left as is).
- Nail the ears to the top of the bunnies with a long nail.
© 2015 – 2016, Food Fun Family. All rights reserved.


The bunny ear pattern is linked in the post, but here’s the link for you: https://foodfunfamily.com/wp-content/uploads/2015/03/Bunny-Ears-1.pdf
How do you get the print-outs for the ears?
Couldn’t you use bags decorated like the bunnies to fill with treats for your family?
Thanks for the free printable ears. I can’t wait to try I am going to make several of them as we have lots of wood left over from construction on our addition.
Hi Visiting from Inspire Me Monday Linky Party. Thank you for joining us on Monday. I’m Janice, one of your hostesses.
Hi! I just stopped by from the Show My Saturdays Link Party. These bunnies are adorable. Love your photos!
These are so stinkin’ cute! Thanks so much for sharing at Project Inspire{d} ~ pinning and sharing!
These are super cute! Pinning and will keep these in mind for next year.
So glad we could inspire you! Have fun making them!!
These are one of the cutest little bunnies I have ever seen! I am going to make these. thanks for the tutorial. :)
I would love it if you would link these up at my party!!
https://www.therobinsnestdesigns.com/feather-your-nest-friday-link-up-9/
Lory xo
This is super cute! My kids would love to do this craft. I like the colors you picked too- very nice.
Thank you! I’m sure yours were very cute, too! :)
These are adorable! I remember years ago making bunnies similar to these. But I think these are way cuter with the distressing, wiry whiskers, and the colorful fabric. thanks for sharing this cute project!
So very cute! Love the colors.