
A few years ago a fellow photographer called me out for not including photos in my older recipe posts. Yep. Me. A professed lover of photography (I never claim to be great at it!) would write posts – recipe posts, even – and not include pictures.

Back in the early days of blogging – the days before Pinterest and Instagram and before everyone used Facebook and Twitter for blog sharing and promotion – images within blog posts were simply not as important. Or at least that’s what I thought. I put up pictures to show off my cute kids and the adventures we’d been on. I certainly didn’t consider how an image could enhance my blog posts, improve my SEO, and drive mega traffic to my blog.
I am now convinced that the quality of the images that I put up in my blog posts is perhaps the number one determinant of how well the post does. A strong image can catch the attention of a Facebook fan or a Google+ reader or a Twitter follower or (especially) a Pinterest enthusiast…and lead to more clicks and more shares of your content.
BUT. Not every blogger is a strong photographer. And, even as a photographer, not every picture that I take is top quality. I realized, particularly with the growing popularity of Pinterest, that a good picture wasn’t always enough to carry a post.
Side note: Of course, I realize that blog post content is a huge factor in blog success, but in this case I’m just concentrating on that first impression and what motivates readers to both click over to read and then stay to finish. Good content will ensure that people keep reading and keep coming back for more.
As Pinterest grew, I noticed a trend growing in popularity as well – the trend to add text to a blog post picture. Particularly with my tutorials, tip posts and recipes, I found that adding the right text and using the right fonts in a picture not only enhanced my photos AND posts, but it increased my traffic significantly. This post about 7 Simple Ways to Encourage Kindness in Kids went viral on Pinterest, and I attribute it to the right combination of photo and font:

I started going back through my old posts that I felt were Pinterest-worthy and have slowly added pin-friendly photos like the one I added below which ended up reviving a 4 1/2 year old post on tips to improve your photography. This one took off on Pinterest as well.

How to enhance photos using PicMonkey fonts
Despite the fact that I own and know how to use Photoshop, I turn to PicMonkey DAILY to add text to my blog post pictures. I used PicMonkey’s free service for months (no strings attached, but limited access to fonts and other design elements) but recently upgraded my account to PicMonkey Royale (on my own dime) because I proved to myself that I would use it everyday. It was worth it for me.
It’s easy to add fonts to your pictures using PicMonkey. Simply click “Edit a Photo” to upload the photo you want to enhance, click on the “P” in the menu on the left side to select fonts, and then click “Add text.” Click within the text box to start typing. You can move the text box to a different part of your picture, change the size of the text box or the font, change fonts and colors, etc. Get creative!

But just plopping down a few words and mixing and matching fonts is not a guarantee of success. There is an element of design that must be followed. Here are a few tips that I try to follow:
- Match the “mood” – try to match the theme or feeling of your photo and blog post with the style of font that you use. If your post is kid-related, like the post I wrote about Back to School Tips for Parents and Kids, then a child-like font is perfect to use (I especially love PicMonkey’s chalk font for “writing” text on chalkboards!). If your post is more sophisticated or serious, stick with a font that reflects that and stay away from the cutesy fonts.
- Try ’em out! – I rarely use the first font that I try on a photo. I always change things around until I am satisfied with the way the font and the picture look together. One of the things I love most about PicMonkey is how easy it is to try things out. If I don’t like it, I just try something else. On my latest recipe post, I tried several fonts before I found the combination I liked the best.
- Mix ’em up – I enjoy mixing up the fonts. Sometimes. Using different fonts can enhance your image by adding emphasis to a word or two, as in the picture of my two boys (looking so little here) in a post I wrote about turning everyday moments into family memories. I wanted to emphasize “everyday moments” and so I used a curvier font AND changed the color of the font as well.


Just beware: not all fonts go together well. Two cursive fonts tend to be too much to put together. Two thin fonts may not stand out enough. Make sure that the styles are complimentary but contrast enough to add that zing you’re hoping for. Since there’s no hard fast rule that says “use A and B together but not A and C” you just have to use your best design eye. Don’t trust your eye? Ask for a second opinion!
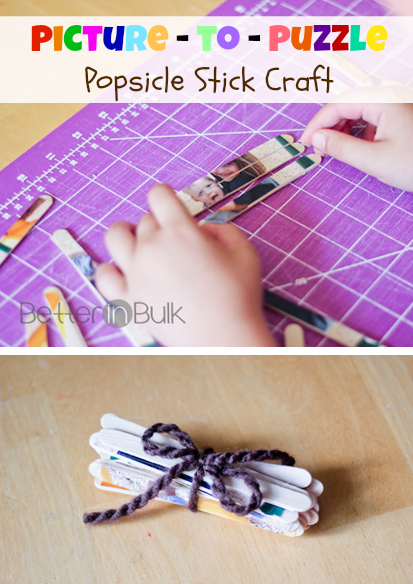
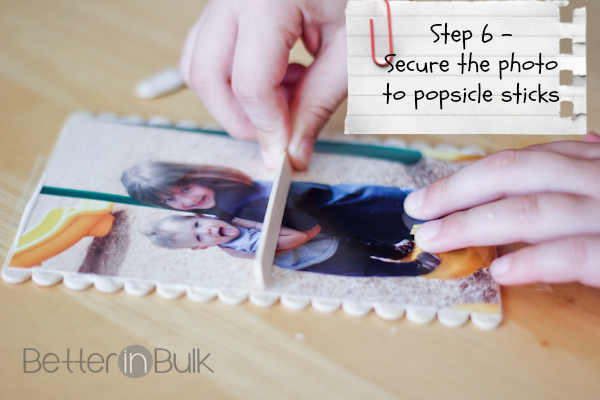
- Know when to use fonts – Remember that not every post needs a text-enhanced photo. Don’t over-do the use of titles on your pictures, but use sparingly for the best impact. PicMonkey fonts are also fabulous for tutorial posts, like the Popsicle stick puzzle tutorial that I posted a few weeks ago. I was able to put directions directly on each step of the tutorial as well as a title on the posts’ main image.
- Go forth and share – After you’ve enhanced your photos with catchy titles, (don’t forget to add alt and title tags to your pics…alas, that’s another tutorial) be sure to share them wherever you can. Pin the post to Pinterest, use Tweetpic to post to your twitter account with a link back to your post, add it to your Facebook page….etc (and always chose that photo with text added!).
How do you use fonts in your blog photos? What style (from other bloggers) has the most impact for you – what makes you want to click over?
© 2013 – 2015, Food Fun Family. All rights reserved.
I have to admit that I’ve been stubborn and haven’t used PicMonkey. I thought it was for newbies that didn’t know how to use Photoshop. HOWEVER, I just tried it after reading your post and it literally took me 5 minutes to create a collage that would have taken me 1 hour on Photoshop! Thanks, Lolli!
Great tips! I use PicMonkey for just about anything and everything and love the features they provide!
Thank you for sharing! I had been wondering how to do this! I am bookmarking this for reference.
I’m a big PicMonkey fan and love using them!
Sometimes I don’t think the average person even needs anything more complicated than PicMonkey. It can do so much!
Well, of course I showed off some of my better pictures…but not all of my pictures are great. I feel like adding a frame and some eye-catching text makes even mediocre photos look good. :) Not saying that your photos are mediocre. lol
SO true! And it’s always there, even when I’m traveling. :)
thanks I’ve already been trying to use this but I didn’t know you can do all that LOVE IT
Great advice! I love how its so easy to use picmonkey because you don’t have to wait for a big program to take 5 minutes booting up.
I LOVE picmonkey! I always add my watermark and try to have at least one image in my post that I consider ‘pinable’ with a label and really eye catching image. Love this post…very informative and helpful. Now, if I could just get a decent camera and make my pics as nice as yours!
I have to say I love Picmonkey, one day I would love to get my head around a more complex photography programme but for now it’s Picmonkey all the way – I am so glad they came back in a different guise after google brought the original company out :) x
LOVE me some picmonkey! This was a great tutorial!
Kas
Yeah, i stared adding watermarks to my pictures a few years ago. I know that watermarks can be removed by someone who knows photoshop and is determined…but I think they help. If not to stop other people from stealing your work, they at least identify a picture as being yours on a site like Pinterest, where sometimes links back to the post get deleted or messed up.
I just recently started doing this after seeing a similar tutorial on the SITS Girls site and I’m starting to go back and redo some of my favorite posts and start pinning them. However, I didn’t think to add a watermark for my blog name. Fortunately, I haven’t done very many of them yet, so I think I wil go back and add a watermark to them. I’ve been hashtagging them when I pin them, but a hashtag can be removed while a watermark can’t. Thanks for sharing.